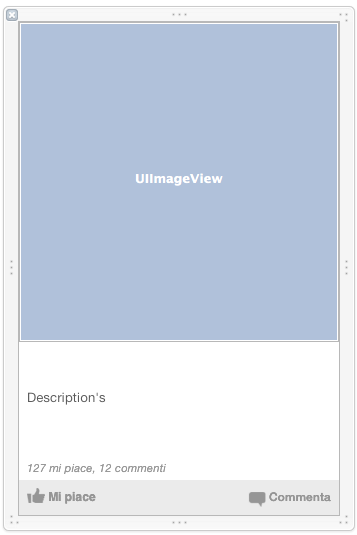
Xcode: UITableViewCell customization like Facebook
i'm working on this UITableViewCell customization and i've try a L O T of things. I've used subviews, i've used drawrect, I've used both, but everytime i can't get a smooth scrolling. Let me add something else: even Facebook news feed not scrolling so smooth, but i see some apps (like GetGlue) that has custom cell (some with text, some with images) and scroll incredibly smooth.
I'm just asking if there is a method that can help me to get the best result.
NOTE: Images are downloaded using SDWEBIMAGE.
here is some code (this is the drawrect method for a subview of uitableviewcell):
- (void)drawRect:(CGRect)rect
{
    // Ottengo il contenuto grafico
    CGContextRef context = UIGraphicsGetCurrentContext();// Background
    CGContextSaveGState(context);
    CGPathRef path = CGPathCreateWithRect(CGRectMake(10, 10, 300, self.frame.size.height - 15), NULL);
    [[UIColor whiteColor] setFill];
    CGContextAddPath(context, path);
    CGContextSetShadowWithColor(context, CGSizeMake(0, 0), 3.5, [UIColor colorWithRed:0 green:0 blue:0 alpha:0.2].CGColor);
    CGContextSetBlendMode (context, kCGBlendModeNormal);
    CGContextDrawPath(context, kCGPathFill);
    CGPathRelease(path);
    CGContextRestoreGState(context);

    // Rettangolo per Social Button
    UIImage *socialRectImage = [UIImage imageNamed:@"activitySocialBarBackground"];
    CGRect socialRect = CGRectMake(10, self.frame.size.height - 35 - 5, 300, 35);
    CGPathRef socialBarPath = CGPathCreateWithRect(socialRect, NULL);
    CGContextAddPath(context, socialBarPath);
    [socialRectImage drawInRect:socialRect];
    CGPathRelease(socialBarPath);

    //###### Immagine

    // Actor Image
    CGRect imageRect = CGRectMake(18, 18, 40, 40);
    CGContextSaveGState(context);
    CGPathRef clippath = [UIBezierPath bezierPathWithRoundedRect:imageRect cornerRadius:20].CGPath;
    CGContextAddPath(context, clippath);
    CGContextClip(context);
    [[activityArray objectForKey:@"actorImage"] drawInRect:imageRect];
    CGContextRestoreGState(context);

    // Actor DisplayName
    CGPoint point;
    NSDictionary *mainTextAttributes = @{ NSFontAttributeName : [UIFont fontWithName:@"HelveticaNeue-Bold" size:13.5f], NSForegroundColorAttributeName : [UIColor colorWithRed:130.0f/255.0f green:27.0f/255.0f blue:67.0f/255.0f alpha:1] };
    NSAttributedString *localeNameAttributedString = [[NSAttributedString alloc] initWithString:activity.actor.displayName attributes:mainTextAttributes];
    point = CGPointMake(66, 23);
    [localeNameAttributedString drawAtPoint:point];

    // Activity Time Type
    NSDictionary *TimeTypeTextAttributes = @{ NSFontAttributeName : [UIFont systemFontOfSize:12.0f], NSForegroundColorAttributeName : [UIColor grayColor] };
    NSAttributedString *TimeTypeAttributedString = [[NSAttributedString alloc] initWithString:[activityArray objectForKey:@"activityTimeType"] attributes:TimeTypeTextAttributes];
    point = CGPointMake(66, 40);
    [TimeTypeAttributedString drawAtPoint:point];

    // Activity Message
    CGSize ActivityMessageTextSize = [activity.shortMessage sizeWithFont:[UIFont fontWithName:@"HelveticaNeue" size:14.0f] constrainedToSize:CGSizeMake(280, 100) lineBreakMode:NSLineBreakByWordWrapping];
    CGRect newTextFrame = CGRectInset(CGRectMake(18, 68, 280, 100), 0, 0);
    [activity.shortMessage drawInRect:newTextFrame withFont:[UIFont fontWithName:@"HelveticaNeue" size:14.0f] lineBreakMode:NSLineBreakByWordWrapping alignment:NSTextAlignmentLeft];


    // Object Image
    if ( [imagesDownload objectForKey:@"objectImage"] != nil ) {
        CGRect objectImageRect = ( activity.object.image.url != nil ) ? CGRectMake(0, 68 + ActivityMessageTextSize.height, 300, 168) : CGRectMake(-5, 68 + ActivityMessageTextSize.height, 310, 310);
        CGContextSaveGState(context);
        clippath = [UIBezierPath bezierPathWithRoundedRect:objectImageRect cornerRadius:0].CGPath;
        CGContextAddPath(context, clippath);
        CGContextClip(context);
        //[[imagesDownload objectForKey:@"objectImage"] drawInRect:objectImageRect];
        CGContextRestoreGState(context);
    }


}
PS: Sorry for my bad english.
Screenshot:

I have just created a social network called startMe . It's very very similar to yours regarding the graphics and the organization. The difference is that you are drawing the cell code, and this ABSOLUTELY no good.
You have to create files with your cells already drawn, and then simply manage the content and height. The height, in particular, you have to calculate it only once in the method of the delegate tables heightForCellAtIndexPath or something like that;)
My project is on sale and I must say it runs smoothly, you can also watch the video on youtube.

I also saw that designs many things with the graphics core and this slows the whole thing. It 'very easy if you act on the properties of the layer images. Following a place in my class that I used to make the images round like you did:
.h
//
//  RoundCornerImage.h
//  startMe
//
//  Created by Matteo Gobbi on 24/08/13.
//  Copyright (c) 2013 Matteo Gobbi. All rights reserved.
//

#import <UIKit/UIKit.h>

@interface RoundCornerImageView : UIImageView

-(void)setBorderWidth:(float)width;
-(void)setCornerRadius:(float)radius;
-(void)setBorderColor:(UIColor *)color;
-(void)setCircleMask;

@end
.m
//
//  RoundCornerImage.m
//  startMe
//
//  Created by Matteo Gobbi on 24/08/13.
//  Copyright (c) 2013 Matteo Gobbi. All rights reserved.
//

#import "RoundCornerImageView.h"

@implementation RoundCornerImageView

-(void)awakeFromNib {
    [super awakeFromNib];
    CALayer * l = [self layer];
    [l setMasksToBounds:YES];
    [l setCornerRadius:10.0];

    // You can even add a border
    [l setBorderWidth:self.frame.size.width/IMG_PROFILE_BORDER_SCALE];
    [l setBorderColor:[[UIColor grayColor] CGColor]];
}

-(void)setBorderWidth:(float)width {
    [[self layer] setBorderWidth:width];
}

-(void)setCornerRadius:(float)radius {
    [[self layer] setCornerRadius:radius];
}

-(void)setBorderColor:(UIColor *)color {
    [[self layer] setBorderColor:[color CGColor]];
}


-(void)setCircleMask {
    [[self layer] setCornerRadius:self.frame.size.width/2.0];
}

@end
This simply extends the UIImageView class, you just set it on the object you have on imageView interface builder. Since then the code in the method that handles the table cells, you can call the methods of the class to set borders and colors if it were needed. Or you can modificarti class for default uses the features that interest you.
- input type="date" appears larger on iPhone
- Capture of 'objectIDNotifications' with non-Sendable type '[Notification]' in a '@Sendable' closure
- How can I find my Apple Developer Team id and Team Agent Apple ID?
- iOS understanding accelerometer data of iphone in free fall
- How to determine the current iPhone/device model?
- How to find days remaining in birthdate
- SwiftUI-Button: Complete VStack clickable
- Why am I unable to override textLineFragments in textkit2?
- How to check if item is visible - SwiftUI ScrollView
- Xcode 7 warnings: object file was built for newer iOS version than being linked
- How to install older iOS SDK in Xcode?
- The file couldn’t be opened because you don’t have permission to view it (REAL DEVICE)
- How do I check to see if user has PIN code enabled on an iOS Device
- How to access a Reality Composer Pro scene in a UIViewRepresentable ARView?
- Is there any way to create/extract an array of Views using @ViewBuilder in SwiftUI
- How to let the app know if it's running Unit tests in a pure Swift project?
- Xcode not automatically creating bridging header?
- Resize UIImage to 200x200pt/px
- How to create a UITextView programmatically, inside UIView that is added programmatically too?
- When do I need to use mediaTypes kUTTypeImage with UIImagePickerController?
- Change NavigationStack title font, tint, and background in SwiftUI
- Swipe to go back only works on edge of screen?
- How can I check for an active Internet connection on iOS or macOS?
- Programmatically invoking tap gesture for UIView
- Xcode 26 built app caused a crash on dyld when launching the app on iOS 17 due to a RealityKit API
- Swift Async awaiting all tasks in task group
- Custom Push Notification for Apple Wallet Pass not Showing up on Phone
- How to change theme style (User Interface Style) immediately in Swift in iOS 13
- How to detect Dynamic Font size changes from iOS Settings?
- UITableViewAutomaticDimension not working properly in iOS 9