FastAPI as a Windows service
I am trying to run FastAPI as a windows service.Couldn't find any documentation or any article to run Uvicorn as a Window's service. I tried using NSSM as well but my windows service stops.
I managed to run FastAPI with uvicorn as a Windows Service using NSSM.
I had to deploy uvicorn programatically, basically run uvicorn directly from your Python script, then create and install a custom service with NSSM.
Here's a small example based on FastAPI's example, but instead of running it with uvicorn main:app --reload from the command line, you add uvicorn.run(app, **config) with your own config.
from fastapi import FastAPI
import uvicorn

app = FastAPI()


@app.get("/")
def read_root():
    return {"Hello": "World"}

if __name__ == "__main__":
    uvicorn.run("main:app", host="127.0.0.1", port=5000, log_level="info")
Then you can install it with NSSM using the standard nssm install command
nssm.exe install "FastAPIWindowsService" "C:\Scripts\FastAPIWindowsService\venv\Scripts\python.exe" "C:\Scripts\FastAPIWindowsService\src\main.py"
Change your service name, the path of your python.exe, and the path of your script accordingly. Your service should appear in the Windows Services Manager when installed.
Hope this helps, and works for you!
Edit: My experience with installing the service with NSSM, as in the example above, is that it would not correctly utilise my virtual environment.
My preferred method now is to use a bat-file that first activates the virtual environment, then runs the desired script. The bat-file can be named whatever you prefer, for example run_app.bat, placed in the same folder as your script, with the following contents:
call venv\Scripts\activate.bat
call python src\main.py
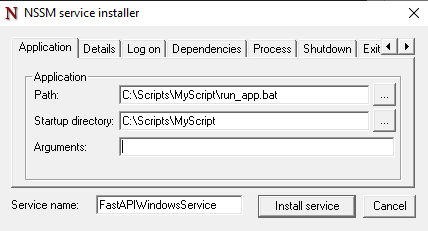
I then use the standard nssm install command, but only provide the service name, as I use NSSM’s user interface to fill in the rest of my required information – file path for example, as shown here:
Again, hope this helps and works for you!
- How to parse a xml feed using feed parser python?
- How to ignore invalid values when creating model instance
- Another question about daylight saving time in multi stack app
- How to write an f-string on multiple lines without introducing unintended whitespace
- Google API Youtube channel list limit result=5 (https://www.googleapis.com/youtube/v3/search)
- Saving the result of an SQLite query as a Python variable
- PIL - Images not rotating
- What does turtle.Screen() actually do?
- What are 0xaa and 0x55 doing?
- Is it possible to type-hint a compiled regex in python?
- Plotting Y data vs X data with alternating colors for each section in Python
- Unable to import pyspark.pipelines module
- What's the best way to parse command line arguments?
- how to output xlsx generated by Openpyxl to browser?
- "turtle" package could not be installed for Python 3 using pip
- Dictionary key name from combination of string and variable value
- Usage of __slots__?
- How to use typing.Annotated
- How do I split data out from one column of a pandas dataframe into multiple columns of a new dataframe
- Flask Load New Page After Streaming Data
- how can I avoid storing a command in ipython history?
- tkinter TclError After Update to Fedora 43
- ChatGPT API - creating longer JSON response bigger than gpt-3.5-turbo token limit
- How does attribute access (.) actually work internally?
- Using create_retrieval_chain due to RetrievalQA deprecation
- Hollow Diamond in Python with recursion
- Polars equivalent for casting strings like Pandas to_numeric
- Getting SQLAlchemy's datetime function to work with an SQLite database
- How can I efficiently `fill_null` only certain columns of a DataFrame?
- Adding widgets to a screen subclass in .py file
